Tables are useful for presenting data in an easy to read format, such as observations made over time:
| Demographic | 2000 | 2005 | 2010 | 2015 | 2020 |
|---|---|---|---|---|---|
| Women | 20% | 27% | 34% | 42% | 50% |
| Minority | 18% | 22% | 32% | 37% | 44% |
| LGBT/Q | 3% | 5% | 6% | 10% | 15% |
| 1st Generation | 1% | 3% | 5% | 7% | 10% |
Instructions for inserting a table into a rich text field, and editing an existing table, can be found below.
Inserting a table
- Navigate to the node to which you wish to add a table.
- Click the Edit tab near the top of the page to enter the editing interface for that node.
- Place your cursor in the body field where you wish to add a table and click the Table button.
- Select the number of rows and columns the table should include from the table drop-down menu; note that rows and columns can be added later.
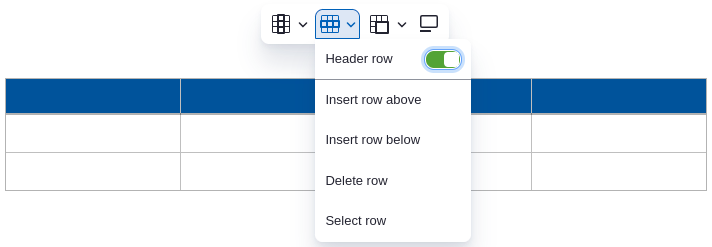
- Place your cursor in the row or column that will be the header, then click the appropriate option in the table menu and toggle the Header row or Header column option:
While not required, table headers are important for accessibility purposes and are used by screen readers to inform blind or low-vision users about the contents of the individual table cells.
- Enter your content to the cells of the generated table.
- Click Save at the top of the page.
Table styling
When editing a formatted text field, there are several display options are available for tables in the Styles menu:
To change the applied style, place your cursor anywhere in the table and select one of the following:
| Table - Basic (this is the default style) |
|---|
| Rows do not have visible separators or borders |
| Every row will be white |
| Table - Striped |
|---|
| No borders will be present |
| Rows will alternate between white and light grey |
| Table - Bordered |
|---|
| Each row will have a border |
| Every row will be white |
| Table - Bordered & Striped |
|---|
| Each row will have a border |
| Rows will alternate between white and light grey |
Modifying an existing table
- Navigate to the node where the table appears and click the Edit tab.
- Place your cursor in a cell and select the action you wish to perform from the table menu that appears above the table:
- To add a column, click the Column menu button, then select Insert column left or Insert column right, depending on where you wish to add the column relative to the column in which your cursor is located. To delete the column, select Delete column.
- To add a row, click the Row menu button, then select Insert row above or Insert row below, depending on where you wish to add the row relative to the row in which your cursor is located. To delete the row, select Delete row.
- To add or remove a table caption, click the Toggle caption menu button. When enabling, enter the caption in the caption text field above the table.
- Click Save at the top of the page.
Note: To delete a table altogether, hover your mouse over the table, click the table select icon at top-left, the press your Delete key.


