Note: These steps are applicable whether you are editing an existing page or creating a new one.
Adding a 200px image feature
- In the Paragraphs Bottom field in the Bottom Content region, click the + Add button and select Image Feature 200px from the Add Paragraph modal window: If multiple paragraphs already exist in the region, you can insert a new paragraph in the location of your choosing by clicking the appropriate + Add button.
- Add optional text to the Administrative Title field; this text will only show when editing the page, including when the paragraph is in a collapsed state.
- Select whether or not to add a margin to the top of the image feature, bottom, or both; this simply adds additional spacing between the image and any content that is located above or below the image.
- Upload an image to the Background Image field (required); it must be larger that 1500 x 200 pixels, and one of the following file types: PNG, GIF, JPG/JPEG, or WebP; set the focal point on the image if necessary.
- Add a text description to the Background Image Description field (required).
- Click Save at the top of the page to preserve the image feature on the page.
Removing a 200px image feature
- Assuming you are in the editing user interface, locate the parallax image feature that you wish to remove.
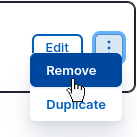
- Click the kebab icon ⋮ (vertical ellipsis) to the right of the paragraph name and select Remove:
- Save the page to commit the change.
Image resources
Please see Image resources for information on where to find appropriate imagery for your website.


